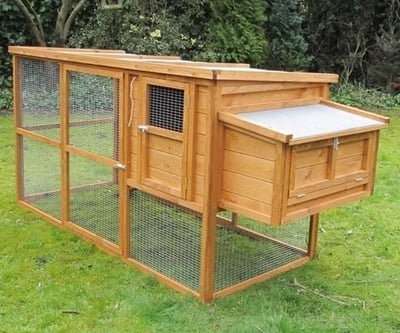
Building a Hutch Company Starter Chicken Coop is easy by following the detailed instructions that are supplied, it is a practical design that uses excellent quality wooden panels and requires only a screwdriver for assembly.
It's an undeniable fact that wherever you live, whether this is an urban or rural environment, that foxes are about and they love eating chickens. So, If you are thinking of keeping hens, it's essential that they are provided with a study and safe coop.
After checking the specifications, I thought the Hutch Company Starter Chicken Coop was most appropriate for my needs. And I wasn't mistaken but, especially if you are not used to assembling flat packs, you may wonder how difficult it is to build a coop.
As it turned out, it's not too difficult at all, even if like me you have limited DIY skills.
Detailed instructions
You should be aware that the two packages that arrive are heavy and somewhat unwieldy. However, in my case, the friendly driver helped me transport the packs from the lorry into my back garden.
There they remained while I extracted and read the instructions, as always this should be done at least twice. It was apparent that I would only need a screwdriver to complete the task, I recommend a powered version as there are over fifty screws.
Moving the packages and assembling the coop is a two-person job. This is made perfectly clear in the instructions that rely on diagrams rather than the written word.
As with all flat packs, all the pieces should first of all be laid out with the fixtures and fittings to ensure that everything is present and correct. Except for two missing screws of one size and an extra one in another size which had absolutely no effect on the final outcome, everything was as it should be.
Complete side panels help construction
One great advantage of this coop's design, and this will save you a great deal of time and trouble, is that the side panels are complete. Tough wire mesh is essential and this is already in place together with the nest box door.
Once three sides are screwed in place, the entrance or 'pop hole' to the nesting area is dropped in. String to open and close the pop hole is already attached. Then the floor is inserted and the end piece fixed into position.
The next box, where the chickens will lay your breakfast, is assembled and then screwed onto the end of the coop. It's covered with a mineral felt roof as is the main roof over the run which is also at an angle to deflect rain. This is secured by screws after an internal ladder is fitted up to the nest box.
And that's it, a really well designed and easy to build coop that's large enough to accommodate at least three hens. Assembly took two people approximately three hours, the instructions were straightforward and the individual pieces fitted snugly together with only a screwdriver required.