How To Assemble A Forest Log And Tool Store
The Forest Log and Tool Store is a handsome garden structure and, now that winter is approaching, a very useful acquisition. Martyn Loach purchased one recently and here he explains how it is assembled.
The Forest Log and Tool Store is a handsome garden structure and, now that winter is approaching, a very useful acquisition. Martyn Loach purchased one recently and here he explains how it is assembled.
Written by Martyn Loach - Editor in Chief
Published on Monday, 7th of November, 2016.
The log store was delivered very efficiently and on time but Forest makes it perfectly clear that this is only a kerbside delivery. On this occasion, the driver helped me carry the parts, which come as one bundle strapped together, to my back garden where it was going to be assembled.
This was definitely a two-man job and if you are less than able-bodied you will need to arrange for someone to help.
Once the straps are taken off, the different panels can be laid out to check whether they are all there and undamaged. Mine were all present and correct, and enclosed with the panels were all the instructions, fixtures and fittings. The different sized screws could then be sorted so that they would be readily accessible
The instructions are fairly clear although some of the wording is quite small and indistinct. Assembly needs two people and tools required are a drill and bits, pozi-drive screwdriver and tape measure. A hammer and spirit level are also mentioned in the instructions but we got along fine without them.
As always with a flat-pack you will do well to read the instructions before commencing assembly, familiarizing yourself with the different parts. Also, don't go headlong into screwing anything into place without being absolutely sure.
We found it easier to fit the right-hand panel by laying the log store on its back but then stood the store upright and deviated from the instructions by first inserting the front panel. The middle section was then secured to the front panel which usefully also kept that part of the structure square.
The shelves were then screwed into place together with the other side panel. Next came the backboards remembering to leave a gap of approximately 20-25mm between them. Although not completely necessary we used longer screws than those included on one end as the panels didn't fit perfectly.
We then decided to fit the door first, so that the doorstop could be placed in exactly the correct position. With the door on the ground, and making sure it was the correct way up, the hinges were easy to screw and fitting to the front of the store wasn't difficult for two people.
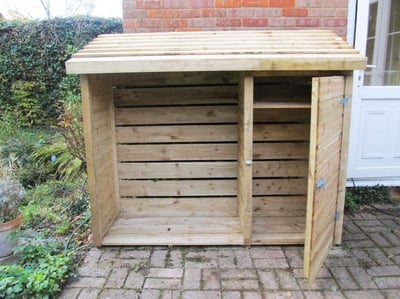
With the pad bolt in place, we then only had to position the roof and screw into place, finished by a strip of decorative wood at the front. The Log and Tool Store was then finished.
Similar to most flat packs, the instructions could be a little clearer but don't be afraid of making minor adjustments. It would also have been very helpful if the individual parts were labelled for easy identification. Bear in mind that there are a lot of screws to fix, so a cordless power rather than manual screwdriver would be a time saver.
Looking very smart and ready for use this winter, my overall impression of the log and tool store is of a practical and sturdy structure with an attractive appearance that will undoubtedly give good service for a number of years.
Shop Now £294.99
Shop Now £609.99
Shop Now £754.99
Shop Now £114.99
Shop Now £234.99
Shop Now £199.99
Shop Now £139.99
Shop Now £189.99